 This week on I Love to Create, it's time for a little card-io! Card making is not only fun, it's a great way to recycle scraps and create a little something beautiful for the ones you love. For this project I mixed media by using technology, paper and fabric. At 8 3/4 months pregnant, I decided to go with a baby-to-be theme, but this technique will work for any holiday or "just because" day. If a sonogram shot doesn't fit your greeting needs, sub out your favorite picture of mom for Mother's Day, a couples photo for an anniversary, or a silly candid shot to make a friend laugh. It's easy to do and the result, is sure to make the recipient's day.
Here's all you need to know to make your own, customized cards!

Materials


That's all there is to it! Now you've got yourself keepsake cards for when you care enough, to send the very best. ;-)

Materials
Blank Cards or Card Stock
Fabric Scraps
Heavyweight or Resume Paper
Scissors
Pinking Shears (optional)
Contrasting Thread
Sewing Machine
Sponge Brush
Step 1: Prep Your Image
- Scan or upload a picture to your computer.
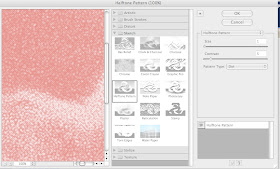
- Open picture in PhotoShop; size, make adjustments and/or add effects. To replicate the look of my photo: Unlock layer (by clicking the lock symbol in the Layers window). Add Text layer, typing in whatever you'd like your card to say (you can save this step for later, if you like.) Select desired background & foreground colors from the Tools window. On the toolbar, select Filter-Sketch-Halftone. Make adjustments to contrast, if necessary. Click "ok" to save changes.

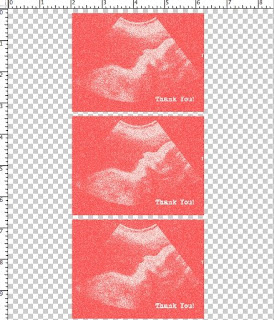
- Once you're happy with your image, lay it out in multiples on a page. Print.

Step 2: Make Layers
- Cut out paper image and fabric square (according to the size of the front of the blank card.)
- Lay image on fabric (jauntily askew, of course); machine sew on using a decorative stitch.


Step 3: Attach Layer to Card
- Trim fabric with pinking shears to slightly smaller than card front.
- Using a sponge brush, spread a layer of Tacky Glue over card front.

- Place fabric/image layer onto the card front; smooth over with your finger. Let dry.
- Repeat with different fabric scraps for a variety pack of card awesomness.

That's all there is to it! Now you've got yourself keepsake cards for when you care enough, to send the very best. ;-)
Have a creative Wednesday!